Does Low-Temperature Heating Need Larger Pipework?
The most common myth you hear everywhere is that low-temperature systems need large bore pipework. This is completely incorrect.
A 10kW high-temperature heat pump running at 70˚C requires about 30l/m flow rate, which you need 28mm pipework for.
A 10kW 30°C low-temperature heat pump system also requires 30l/m and so also needs 28mm pipework.
The main variable is how much water flow rate you need to move and that depends on how much energy you have to move.
Double the heating load to say 20kW, then you will need to double the flow rate around that system and require much bigger 42mm pipework. Or half the load to 5kW and you need half the flow rate and a 22mm pipe will be fine.
First See How Much Power You Need
For more information on this watch our how to size my heat pump video below:
https://www.youtube.com/watch?v=-VJQLcU_YjU
What is Your System’s ‘DT’?
The only other variable that affects this is the system DT. The system DT is the temperature difference (DT = temperature difference or delta temperature) between the flow and return pipes.
Now for heat pumps, we want to aim for a temperature drop or temperature difference across the system of between 5 and 7. The heat pump will raise the return water temperature by 5°C, or you could say that the radiators drop the flow temperature by 5°C (5 is best).
To give an idea of perspective, a boiler has a system temperature drop, or DT, of 20. As the slower the flow rate, the wider the DT, which means that boiler flow rates are exactly 4 x slower than a gas boiler.
So once we know the DT and power in kW required, we can work out our flow rate in litres per second using this angle, watch our mass flow rate video for a full explanation.
So knowing that a narrower temperature drop means a faster flow rate when upgrading from a gas boiler to a heat pump you'll be forgiven for thinking that with 4x faster flow rates you'll need 4x larger bore pipes.
Will My Existing Pipework Do for a Heat Pump?
But there's issues there which means in most cases, most of the heating pipework is ample for heat pumps.
- The first reason is pipework in older systems from pre-2005, boilers were designed for DT11. That's 2x faster flow rate than current boilers use, this gets them much closer to the DT (or temperature drop) of 5 to 7 they need to be.
- Insulation has improved since they were installed. Most homes and heating systems in the UK were installed between 1920 and the 1970s. These properties have all had HUGE upgrades since then and typically have halved heat losses meaning that old pipe work is sized for loads 2 x higher than needed and so the pipes are oversized.
- Most installers historically install based on these old outdated rules of thumb rather than calculating.
- A small increase in pipe bore allows for much higher volume, in fact, if you double the diameter the volume is 4 times higher. This gives a lot of wiggle room with existing pipework.
Now bearing all that in mind let’s see if you need to upgrade your pipework.
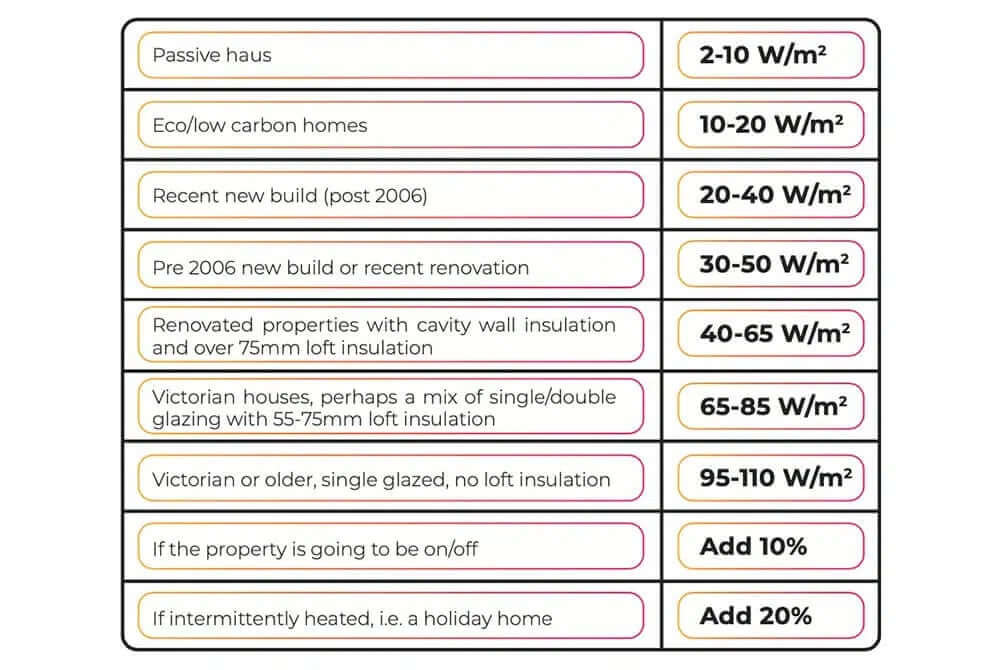
Take a look at our cheat sheet here, you can grab this from the link in the description.

Here you have the external pipe diameter on the left, and how many kW/s of power the pipe can carry in the centre.
Now in theory you can carry any amount of water or power through pipework, it's just that as the speed of the water moving against the wall of pipe increases as you try to squeeze more power through, it can cause some major issues.
First of all, as speed increases, you get what's called erosion-corrosion. This is where the wall of the pipe is corroded, causing dirt in the system and increasing the corrosivity of the water, and in extreme cases, can wear through the pipe.
Secondly, you get more noise around your system. Not something you want when you're running for longer periods
But lastly and most importantly for heat pumps, the increased turbulence in the pipe and fittings gives an exponentially increased resistance to flow. If this resistance is too high you won't get the flow rates needed and the system simply won't work.
So the speed at which this water moves round is called its velocity, it has typical limits of between 0.5m/s and 1.5m/s maximum.
Now you typically aim for a velocity of 0.9m/s, after this point the resistance to flow really starts to jump up quite rapidly, so as heat pumps need these much higher flow rates we really don't want to exceed this too much.
And that's what we have here in this top column, 0.9m/s, and the relative temperature drop.
So let's say you work out that you have a total property heat loss of 7kW, and you have 22mm primary pipework in the house. Primary pipework is just the main pipework before it tees off to the radiators.
Here we can see that if we want to maintain our optimum of DT5 we can only run 6 kW, though in reality, 7 would probably be okay and the velocity may increase to 1, let's say 6 is our limit. If we run the system at DT7 you can see that this will work!
In reality, to maintain a velocity of 0.9 it could operate at DT6. None of this is strict, there is a lot of wiggle room.
It's also worth noting that there isn't really pipework that's too big. If the pipe can carry way more energy than you require, that's just fine as with heat pumps, the extra volume is actually quite handy.
Now if our load was actually 12kW you can see that your system may need to run at DT10. Heat pumps won't run at DT10, they are likely to throw up faults.
There are a few options here. First of all, this only means the main run to the heat pump needs to be 28mm, not necessarily any of the existing pipework.
Take this system for example,
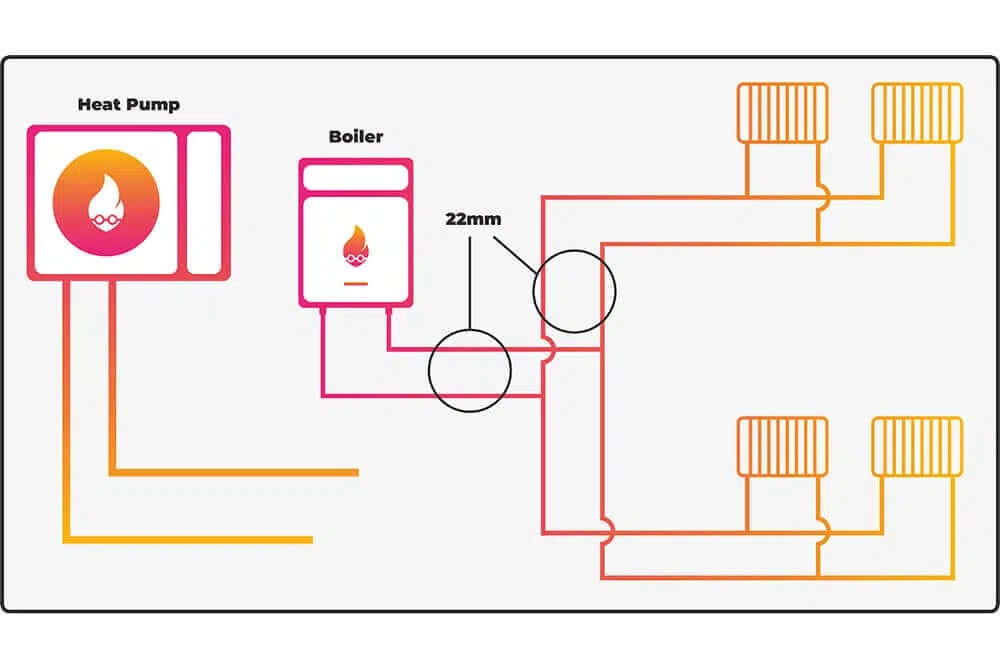
This primary pipework here and here is 22mm, we know we need 28mm from the heat pump.
But if we remove the boiler and tee it into the system here, the pipes can remain as 22mm as some water is flowing up this way and some water flowing down this way.
You can work out how much flow and what pipesize is needed by measuring the floor area of these rooms and using our heat loss cheat sheet then using our pipe sizing chart again.
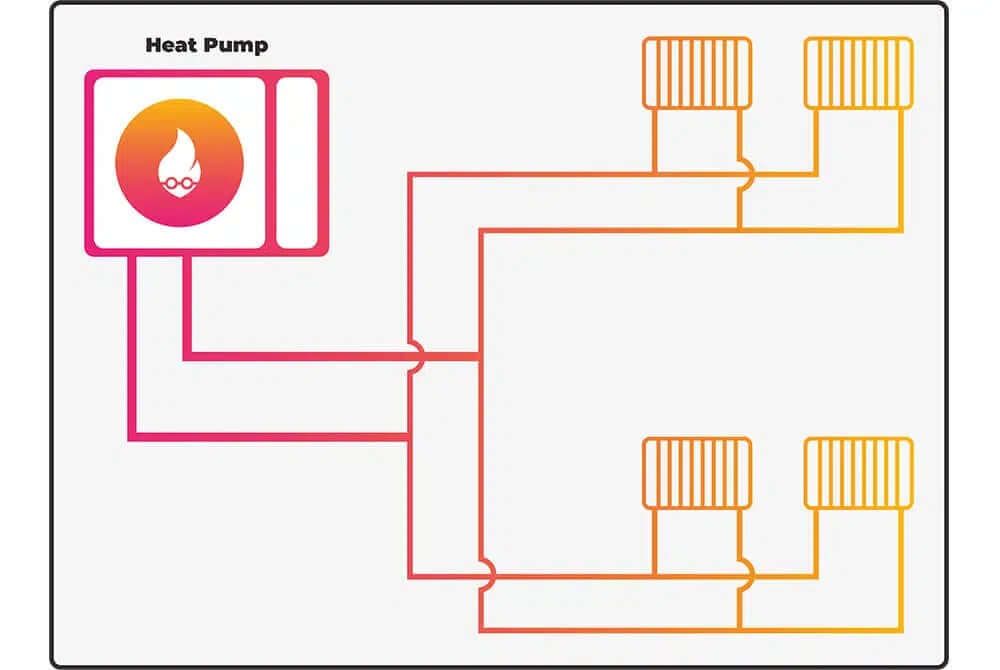
So in this case, absolutely none of the existing pipework needs replacing at all. Perhaps just the small communal bit of pipework if we are connecting on to the old boiler tails.
If we found out upstairs there was a very low load, and the lower radiators here were in higher demand, the older main pipework may need to be upgraded to 28mm unless you use the next option which is hydraulic separation.
Hydraulic Separation Instead of Upgrading Pipework
Hydraulic separation comes in the form of a close-coupled tee, a low loss header, and a buffer or plate heat exchanger.
It provides a ‘hydraulic break’, so the heat pump only needs to pump to the low loss header, for example, then you can have a pump on the system side running at its own, lower, flow rate to suit the undersized system pipework.
As with all engineering though, this is a compromise. If we cater to the smaller pipe on the existing system by running at a slower flow rate this creates what we call ‘distortion’.
This essentially means the heat pump has to run slightly hotter than it otherwise would have done and your heat pump efficiency (or scop) will slightly drop, or it may now require temperatures higher than what the heat pump can produce.
Of course, you can account for this by installing even larger radiators, but radiator size should be maximised already to maximise COP and will add cost.
So adding something like a low loss header or buffer is a compromise, and if not needed should be avoided.
If you're a bit geeky like us, watch our ‘Why NOT to use Low Loss Headers’ video to understand exactly why.
Why NOT to use LOW LOSS HEADERS! The Low Loss header explained.
Bear in mind there are other design criteria here like pressure loss, but this is being kept simple for the sake of this article.
The other reason you may need a buffer is for system volume, however, we suggest using a volumizer setup here which negates any distortion.
System volume shouldn't be an issue in most scenarios though as this should be catered for by a decent control strategy, which we will come on to another time.
So that covers the primary pipework, most radiators are supplied by 15mm pipework which is fine for up to 3kW of demand and is fine in the majority of most situations.
If you have smaller bore pipework than that, use our heat loss chart to find the demand for the room and you can see for yourself if the pipework is ample.
The last option is…
Insulation
Insulation to upgrade pipework? Yes, rather than spending your hard-earned money on pipework upgrades, why not look at insulation?
Improving insulation instead of pipework will do 3 things
- It will effectively increase the relative pipework size as you'll need less power in each room
- It will mean the radiators you have sized will be able to run at a lower temperature and further increase the COP at your heat pump and lower the fuel bill
- It will lower your overall heat demand which will further lower your electricity bill
Ok, that's it for the complicated bit, here are a few other points.
First of all, these numbers are NOT for plastic pipes. The plastic pipe should absolutely NOT be used in a heating system, and particularly not on a heat pump, in our opinion, for many reasons which we will do a video on soon.
But if you are using a plastic pipe or have an existing system, you will need to jump to the next size up with these pipe bores due to the restrictive inserts in the fittings which add resistance to flow and will also make balancing harder.
The other thing to look out for is particularly long pipe runs, you will want to make sure you err on the side of caution with this cheat sheet in those cases.
The other caveat you see here is that if you have glycol in your system.
Glycol is essentially anti-freeze for your system which seems like a good idea as your heat pump is outside.
But as with all engineering, this has a compromise, it lowers the water's ability to carry heat and so requires an even faster flow rate. For this reason, we suggest not to use it and use anti-freeze valves instead, but if you are using glycol you want to shave 10% off the expected load-carrying capability.
If this seems all too complex, all our heat geeks know this inside out, contact them or use our ASSURED Heat pump installation service: For a Heat Geek assured installation, read more here.