You'll often find one of two scenarios with many heat pump installations.
One is that during the handover of your new system, you will be a bit overwhelmed with the amount of information given verbally and on paper, or that you will get a very quick demonstration of the thermostat and be told not to touch anything else!
Well the latter could be a good idea if the installer has completed the commissioning sequence we are about to attempt to explain.
But in reality it is highly likely they haven't really fully commissioned your system to its full effectiveness or efficiency at all!
Many people look for the most efficient heat pump possible according to the badge rating with little appreciation to the controls, installation or commissioning of the unit, and assume if the unit has good statistics it will automatically give them great efficiency and nice low running costs.
In actual fact, the unit makes nowhere near as much difference as to how it's installed and controlled.
Even if it is installed well, if it's not commissioned very well, it could absolutely ruin the system COP/ efficiency!
As I say, this is very rarely done and is the part where you may be able to pick up some crucial adjustments to totally transform your system performance.
OK, before you do this, you may want to ask your installer if they have already done this or if they can do it first, and please only progress if you're confident in doing so, as if you play around with too many settings you may have to end up paying your installer to come back to fix it.
The key thing to understand when you're trying to maximise the efficiency of heat pumps or condensing boilers (which should have been fully explained during your installation consultation) is that the lower the flow temperature, the higher your heat pump COP (or efficiency).
Now the temperature your radiators need to be to maintain your desired room temperature isn't the same all year round.
For example your radiators need to be 50°C when it's -2°C outside for you to be comfortable, but they won't need to be 50°C when it's 12°C outside in spring and autumn; perhaps they'll only need to be 35 degrees?
If they are still running at 50°C during autumn and spring, the room thermostat will just switch the heat pump on and off repeatedly to dampen their output and stop you ‘over heating’, which isn't the best idea for efficiency, you don't drive your car at 70mph and 0 mph to average 35mph.
So to minimise the flow temperature on an ongoing basis, allheat pumps should use a feature called weather compensation.
Weather compensation simply measures the temperature outside.
If it's colder, it increases the required flow temperature from the unit, and if it's warmer outside, decreases the flow temperature required.
Hot outside gives cold rads; mild outside gives mild rads; and cold outside gives warm rads.

This decreases the amount the heat pump cycles on and off and decreases the flow temperature to a minimum which maximises your heat pump (OR BOILER) efficiency. This is absolutely essential on heat pumps!
The fine tuning of these flow temperatures relative to the outside temperature is where our hidden efficiencies lie.
Now the flow temperature required for any one outside temperature is very different for every house.
Our target is to get these flow temperatures down so low that the energy being put into the property, exactly matches the energy leaving through the walls and the system stays in perfect equilibrium at your desired set temperature.
If we set these flow temperatures too high, your property should be too hot, if the flow temperature is too low, your property should be too cold.
One thing we should try and expel from our mind is that your heat source is designed to get the property up to temperature and then turn everything off with a thermostat, then turning back on the heat source once the temperature drops again.
In most cases, this was old, outdated thinking from 15 years ago, let alone today.
Instead, as I say we want a nice equilibrium of maintaining the temperature in the building with constant flow and the lowest possible flow temperatures while maintaining comfort and minimising this switching off.
Bear in mind, this will and should also influence how you use the system, which we'll come on to later…
Before starting, you'll need to check you have a system with weather compensation functionality (pretty much all heat pumps do, as well as higher-quality boilers).
But to reconfirm this for your specific unit, you'll need to speak to the installer or dig through the instructions.
So, once you've confirmed this, to recommission your system…
Step 1: Turn All TRVs and Room Thermostats to Max
The way we are going to test if our system is putting too much or too little energy into the system is by how close our property is to our target temperature without these additional controls restricting or telling the heat pump to turn off.
If the property is too hot we know we need to reduce flow temperatures and if the property is too cold we need to increase flow temperatures.
If you notice that some rooms are hotter than others when doing this then your system needs balancing. We have an article on this you can read the Ultimate Guide to Balancing here and your thermostat and higher previous flow temperatures masked this unbalancing issue.
Step 2: Turn Down the Weather Compensation Curve to the Minimum While Still Maintaining Room Temperature
Ok, so every appliance weather compensation control will be different.
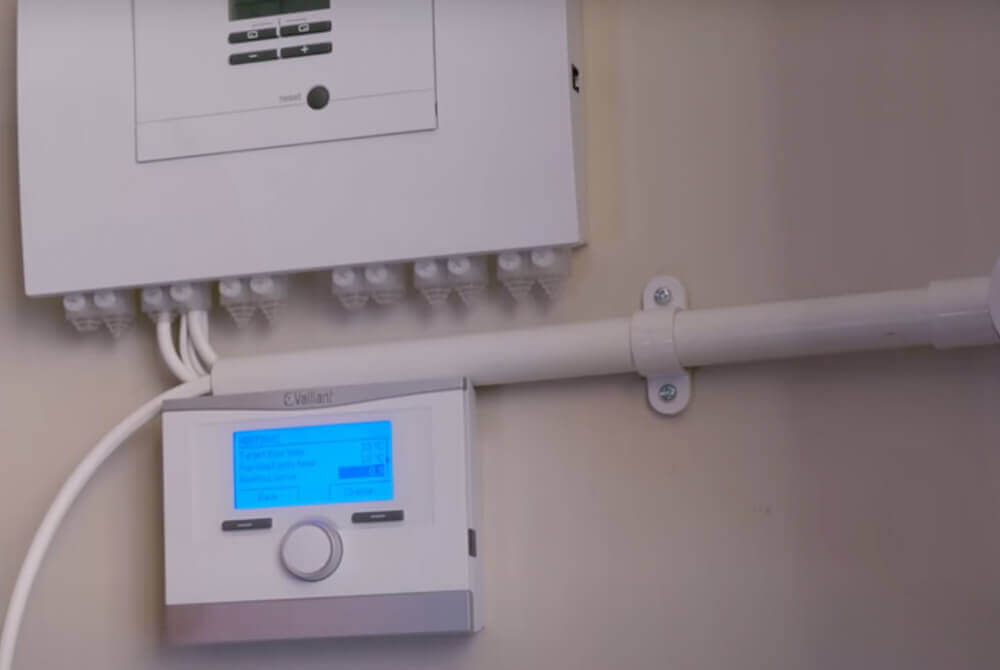
Here's an example of a Viessmann and Vaillant weather compensation control.
If you look here at this setting we have a flow temperature relative to an outside temperature.
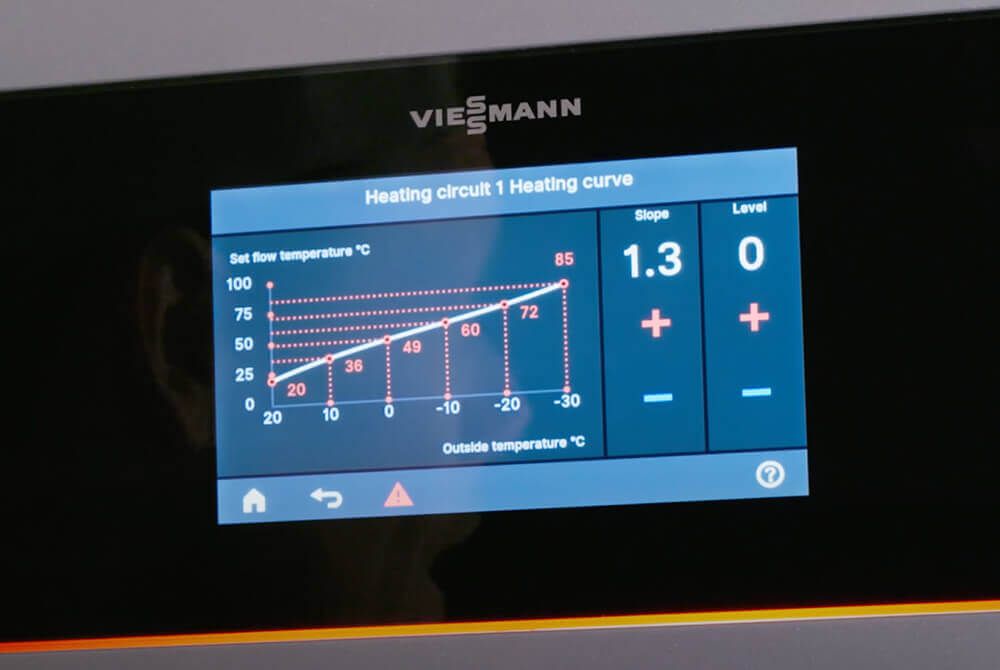
As the outside temperature drops, the flow temperature from the heat source increases.
If your property is too warm, we need to decrease these flow temperatures, so we reduce this line, known as the heating curve. Thich lowers the flow temperature and hinges around the 20°C outside temp for the 20°C internal temperature point where all the lines converge.
On this Vaillant system, we adjust this number. The number the curve represents can be found in the instructions but it's kind of immaterial, we just want to do fine adjustments until our target temperature of say 21°C is achieved.
Some large scale installers physically turn weather compensation off all together through risk of call backs. This is a huge oversight. Please find the compensated option and turn it back on.
You may have to put a few little thermometers around to see what your room temperatures are.
We like these little thermostats from Govee, they come with data loggers so you can also see what's going on in the house historically and adjust accordingly.
People also like the Sonoff sensors as they can feed into your home assistant.
Purchase the Sonoff Sensor here:
Please note: It's best to do this when it's as cold outside as possible.
If you set this when it's 0°C outside you'll find that all the rest of the year will fall into place nicely, setting the heating curve when it's 13°C outside will generally require another adjustment.
Some weather compensation works slightly differently and have a maximum and minimum flow temperature to adjust. So you would set your flow temperature when it's 0 to -3°C outside, then again at say 16°C outside.
As I say, all controls will be different but the general theory and target is the same, you want as low a temperature as possible and to get this curve right down.
Step 3: Controlling Your System
Once we have lived with the system for a day or two, and are confident we have an accurate curve set up, there's three things to be aware of when we add your controls back into your system:
- Minimising Setbacks
- Minimising Zoning
- Minimising 3rd Party Controls Interference
Doing all of these things will maximise heat pump or boiler COP, but may be necessary for comfort. You'll have to find your own balance.
First of all, you want to minimise set back differentials.
This is the difference between the day time set temperature and night time set temperature, or between used and unused rooms.
Let's say for example, that you have a target room temperature of 21°C during the day, and you turn your night time temperature to say, 16°C.
You're essentially turning your heat pump off during the night as the property is unlikely to drop below 16°C overnight, unless perhaps, it's very cold.
What this then means is that you will either have to have a much higher than necessary curve in order to heat your property in the morning within a sensible time, or, bring on your heat pump much much earlier than you need the heating on which is again wasteful.
Most people like cooler bedrooms for sure, but if your room is actually maintained at 5°C below your usual comfort temperature you'd be pretty cold when laying stationary in bed.

So instead we would advise, especially in the case of underfloor heating which is slow reacting, to heat with a 2°C or 3°C setback, this keeps the thermal mass of the property fed with energy so flow temperatures can be kept at a minimum.
As always though, it's a personal balance between comfort and efficiency that must be struck and this will depend on various other factors like the properties thermal mass, individual user requirements, as well as how good the weather compensation is.
I like to think of a wider set back as brakes on a car; the wider your set back, the more your brakes are applied and the more revs and fuel you're going to have to use to get back up to 21°C again.
Minimise Zoning
If you have a wider set back differential between used and unused rooms, this is again akin to pressing the brakes while also accelerating.
By essentially turning off radiators within the thermal envelope of your house, you're restricting the surface area the heat pump has to use to let go of the energy.
Because of this we will need higher temperatures at the remaining ‘on’ radiators and underfloor heating. In other words, you'll need a higher heating curve, which lowers COP.
We have a video explaining the exact maths behind this and why you potentially don't want to zone your heating system at all here: Why Not to Zone Heating Systems

Limit 3rd Party Controls
So, once we have minimised zoning and setbacks to levels you are happy with and got your heating curve right down, it's time to reintroduce the trvs and thermostats, but only as temperature limiters! Not temperature targeters.
What I mean by that is that these are 3rd party controls, which means they don't typically communicate intelligently with the heat pump.
They simply send back an on or off signal or strangle the flow from the unit which can be helpful for internal heat gains such as cooking, hair dryers, solar gain or parties.
To make sure that we don't apply these breaks too much we adjust all our trvs and thermostats to approx 1°C-ish above the target temperature.
If we have a very basic weather compensation that you'll find always gets slightly too cool or hot, rather than maintaining an accurate indoor temperature, the main thermostat will need to be set at your target set temperature.
Bonus pro tips
How much additional control is needed really depends on how good your system's weather compensation is.
There's essentially 2 different levels of weather compensation, basic and advanced weather compensation.
Most heat pump weather compensation is quite basic in all honesty, especially the aircon derived units, where as systems from european heating manufacturers like Viessmann, Vaillant or NIBE, as a general rule tend to have high quality advanced weather compensation which really doesn't need much, if any additional control..
Advanced weather compensation can obtain accurate room temperatures without any internal reference once you've dialled your weather compensation curve in.
This means it continually runs rather than being flicked on and off by a thermostat, which minimises flow temperatures and cycling which of course maximises efficiency.
It has a wide selection of curves to fine tune this as well as what's called parallel shifting.
Parallel shifting means you can set up a different temperature for say night time and it will automatically shift the heating curve down in a parallel fashion.
This will then target the new room temperature with a new, even lower flow temperature and as it's putting in less energy, prevent the need of a thermostat to flick the heat pump on and off at unnecessary higher temperatures.
With this we essentially drop a gear instead of applying brakes so we can take advantage of the lower temperatures reduced loads offer.
In other words, lower the flow temperature instead of pulse the unit on and off.
To illustrate this further, advanced weather compensation also has the ability to add in some room feedback or what's known as internal influence for more accuracy if required.
This essentially shifts the required flow temperature very slightly depending on if the property is below or above the set temperature and kind of autocorrects the curve based on internal influences.
Helpful as this keeps the unit running and can take advantage of higher cops from even lower flow temperatures.
However, we want to minimise this influence on the flow temperatures as it can also increase the flow temperature.
Wth very advanced units, you can tailor the amount of room influence to suit your property, more room influence means more accuracy and responsiveness, but also higher potential temperatures.
Advanced weather compensation can also give options such as the amount of boost to the flow temperature when coming off set back and time of boost to adjust in conjunction with your desired heat up time.
This can reduce heat up time, but also again can give higher flow temperatures, and you would also adjust this in combination with a sensible setback temperature until you find what works best for your property.
We have an in depth article on this on Heat geek.com called weather compensation vs room compensation, you can read here: Weather Compensation or Load Compensation.
Last bonus bonus tip
Hot water temperatures, the temperature at which you store your cylinder, should be relative to your hot water store size.
If your cylinder is prone to running out, it may need to be hotter. But if it doesn't run out you can comfortably set your store temperature to as low as 48°C.
This will not only have less heat loss from the cylinder, but also the heat pump will work at fractionally lower temperatures too.
Bear in mind it's advised to have an anti legionella cycle in place to lift the hot water temperature to 60°C every once in a while.
How often you need to do this, or if you really need to do this at all, is a subject of contention.
If you've tried any of these things and made an improvement, or you have a tip we've left out other than turning down your target temperature (which is very valid) please let us know in the comments!
There we go! Remember if you want an engineer who fully understands this theory, why not check out the Heat Geek Map where you can find engineers that have undergone our high level training and refine this system for you.